Sunday, May 15, 2011

Track

This is Week 3 Lab 2
I was to model a track from a reference image given on olive.
Using the polygon create tool, I drew the baseline for the track.


After that, I rotated the model extruded and created a long track


And then, I extruded the faces at the bottom and "blunt" the edges.


Finally, changing the curvature and bounds in the bend deformer tool, we can bend the track.


Reflection


I think that in this assignment, it was good that we learnt how to use more of extruding and create polygon tool, but perhaps it is better if we practice more on the bend deformer as it is very useful especially when in animating simple objects we don't want to give a skeleton to.

Gear


I believe this was Week 2 of E-Learning?

Anyway, here goes.
I'm not very sure whether I had to download anything from olive, but this looks relatively easy so I'll just do it.


Process


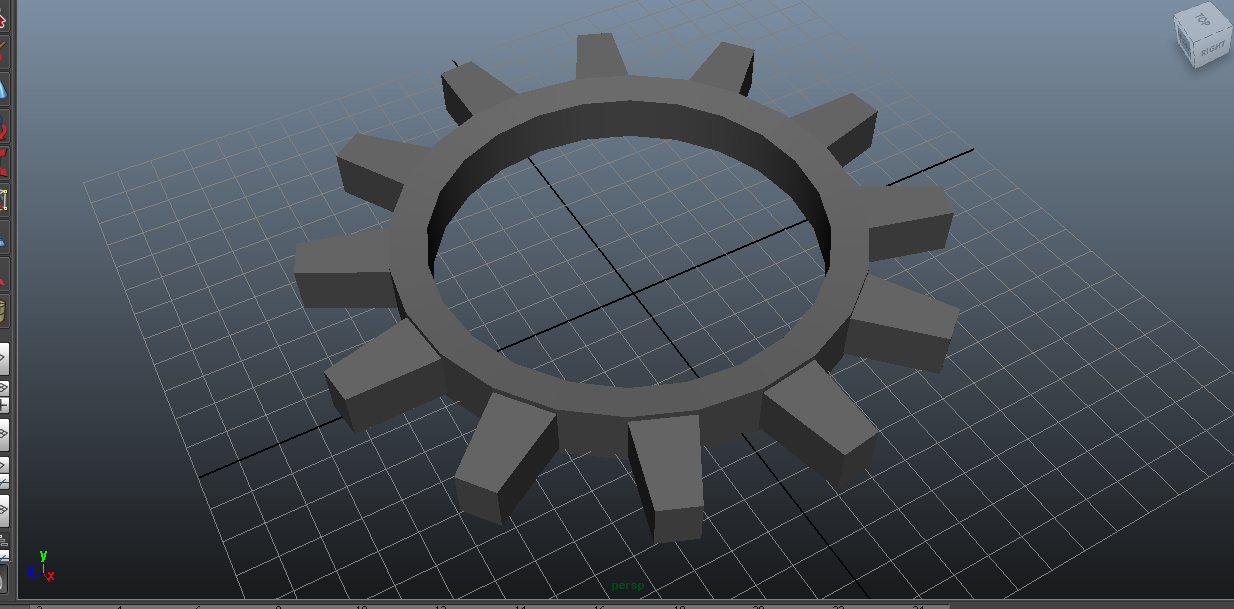
I create the base of the gear using the polygon pipe tool.


Clicking on polyPipe1, I increased the subdivisions to a number I was satisfied with, I think 24, 5 is enough.


Selected the faces that I need to extrude.


This is what I got after that.


After some editing, here it is. Yes, it does look skinny. But this can be easily changed by selecting all faces inside of the gear and then extruding.


Techniques & Reflection


The techniques used are very basic as it only involves extruding faces. But then again, I understand that we need to start small and soon build our way to El Dorado, but perhaps something harder next time :D?


Jokes aside, I felt that this was a simple yet good practice to let people get the hang of face manipulation and extruding, though I felt that it should involve some vertices manipulating as well.

Tuesday, May 10, 2011

Primitive Breakdown


Well, this is a really rough sketch of the mammoth tank. As you can see, the circles, triangles and rectangles are really easy to see here.

The purpose of this exercise is to give us enlightment on how to plan for complicated models such as the tank by breaking down into simple shapes that we can actually start on without thinking so far ahead.

Although this has already been said as "common sense" to me, but to others it may not and I feel that this exercise is hinting me this(refering to prev paragraph).

Saturday, May 7, 2011

Prison & Wonderland

Picture here
One houses villians, the other - toons.
Though made up of similar primitive shapes of triangles and blocks, the main
difference between the two are the looming, enigmatic tall buildings of the prisons; and when compared to the toony, beveled/rounded features of the toon town, the feeling of being a captive and a tourist are vast lengths apart.

The toon town uses more pillars and whacky shapes to bring forth the feeling of a cartoony reflection of the town. In contrast to the toon town, the prison uses less shapes and aesthetical features(using basic blocks, triangles and cylinders) to foster an environment of seriousness.

Monday, May 2, 2011

Sword Test


Just a self-training session.
Not really good.

How is this done?
The whole model is split up into 3 different areas, the handle, the blade, and the tsuba(guard, the rectangle thing that seperates the blade and the handle). Though I have no step by step picture, I will describe the areas to describe.

Handle
For this area I created a polygon cylinder and used the cut faces tool to cut out the diamond shapes. I extruded the faces that weren't forming the diamonds by selecting the diamond faces and using invert selection. By doing this, I created a depth to mimic the "cloth" material wrapping around the handle.

Using the hypershade, I just simple applied an image from my stockpile that is of cloth-material-lookalike on all the faces except the diamond faces on a lambert.

Tsuba(Guard)
A simple polygon cube scaled and extruded to form a border around the cube. Selecting the faces to be colored on, I applied the materials the same way I did for the handle.

Blade
I seperated 3 different sections of the blade using the edge loop tool to form a arch to mimic the deadly curved shape of the katana. To form the depth of the sword(the sharp side of the blade) I scaled the sharp ends of the blade. Using a little of the bend deformer to do finishing touches. Finally, added a texture and set the required color setting to form a metalic finish to the blade.


Reflection


I did this model out of pure interest and no referencing images were used. I think that the more we practice especially on things we like to do, the better and faster we get.

Katana:
Click Here

Katana with unfinished sheath(just a status update):
Click Here

Sunday, May 1, 2011

Primitive Robot?


This is a very rough mesh of a battle robot .... made various mistakes here and there and definitely not the type of standard for submission... but oh well, practice counts!

Name : Mat Cat

Behavior: The Mad Cat is a very versatile robot that can traverse onto many different types of terrain, not only that, the Mad Cat can launch a flurry of LRMs (Long Range Missles) through its "ears"(the two boxes beside the main body). The two arms carries light cannons and laser cannons.


Will probably texture it in time to come.


Process:


A basic dissect of the mech


Techniques


The techniques used in this whole mech was mostly based on extruding faces, edge loops and manipulating vertices. Of course, I mirrored the robot after I finished working on one side so that the model will be symmetric(Duplicate Special Tool). Well, another inaccurate way of mirroring your model was to over-scale on the x-axis. But using this way might not give the most accurate result, thus duplicating special is a better way.


Many of the shapes were built on the polygon cube and extruded into the many shapes shown above.


Since I did not take screenshots during the process, I would like to share more about the weapon arm of the robot.


As you can see, this part of the robot was extruded from the main body by selecting a specific face and using edge loop tools to define this face. From there, using the extrude tool and manipulating with vertices at some points such as the curve, I have ended up with this

Thoughts

The tools used for this model were not of vast variety, rather, it was more time consuming rather than difficult. The only major problem I had was with the cockpit(the round thing in the middle of the body). I was to practice topology and managing vertices with this exercise.

P.S This is my "primitive" robot.


The Robot: Click here

Orthographic view: Click here

Render: Click here

EDIT: Added a few stuff(no texture yet)
Click here

Reference
Reference to Topology

Toy Blocks Modeling


Tools used


I manually edited the polygons using vertex, extruding, faces etc. For the second(the toy train)model, I used the boolean(difference) and extruding to dig into the main body of the train(the two holes).

Well, in this exercise, I found it very easy and the only thing that I found that is noticably important was the boolean->difference.


Using the boolean difference tool, you must click the main square then shift-click the cylinder then apply the tool.


I created a sphere using the polygon sphere tool and sliced it into half. I then manipulated the vertices on the top to make it flat. This method is also used to develop the green block of the train.


Reflection
I found that in this exercise, I practiced more of texturing rather than how to manipulate the shapes as most of them are still in their primitive form. At first glance, I found out that there were lots of primitive shapes used and actually said to myself "piece of cake" - well... It actually was.

For example, the green body of the train was jus a basic scaling and moving of certain vertices.
I joined the rectangular body of the train to the green and blue blocks rather than extruding them from the main base. the wheels and blocks were done the same way.


However, as you can see, I used a range of different textures in this model such as Blinn, anisotropic to create a certain shine to the model.


Toy Blocks;

Click here

Toy Train Isometric;

Click here

Toy Train Orthographic;

Click here

Toy Train Isometric(Simple Textured) w/ Render view;

Textured:Click here

Render View:Click here

Wanted to do shaders, but didn't.